
Overview
Campaigns and segments are the primary tools used to organize fundraising data. Effectively using them allows you to track specific fundraising avenues, manage donations, and generate accurate reports.
When you need to search for contribution data, you can navigate to the Search section and then select Contributions. From there, you have the option to either select an entire campaign or choose specific segments within that campaign to focus your search.
This structured approach allows for more precise data retrieval and analysis. To further analyze this information, you can also generate reports. One useful report is the Campaign Summary Report, which you can access by going to the Fundraising menu, then selecting Reports, and finally choosing Campaign Summary. This report provides a comprehensive overview of all campaigns along with the total revenue each campaign has generated, helping you assess the overall success of your fundraising efforts.
Contributions can be added automatically through forms linked to the campaign, or they can be manually entered into the Databank, offering flexibility depending on your data entry preferences and workflow.
Campaign Structure
Data in the Databank is organized into a three-tier hierarchy:
- Campaigns: The top-level container for your fundraising effort.
- Segments: Distinct components within a campaign (e.g., event sponsors, ticket sales). Beneath these segments in the organizational hierarchy are the individual donations, which are recorded as contribution records within the Databank. Each contribution record is linked back to the specific segment and campaign it belongs to, ensuring that every donation is properly attributed and can be analyzed accordingly.
- Contributions: Individual donation records, which are linked to specific segments and campaigns.
Campaign Metadata
You can classify your campaigns using the Campaign Type field. This does not change the structure of your data; rather, it acts as a label that helps you filter and analyze your fundraising efforts across different channels (e.g., Direct Mail, Email, Event) when you run reports.
Before You Begin
- Have your Campaign Code ready.
- Decide on your Segment structure (e.g., donor level, channel).
- Ensure you have the required administrative permissions.
Pro-Tip: Need help with structure or reporting? Use dBot™
If you aren't sure how to organize your segments or which metrics to prioritize, you don't have to do it alone. You can simply ask dBot™, thedatabank’s AI-Powered Assistant to help you plan and analyze your work.
- Building Structures: If you’re unsure how to segment a new effort, try asking dBot: "Help me create a fundraising campaign structure for my [Annual Gala/Year-End Appeal]." dBot can suggest a logical hierarchy of segments based on your goals.
- Generating Reports: Once your data is collected, ask dBot to help you get the insights you need. Try prompts like: "What reports should I run to evaluate the success of my [Campaign Name]?" or "Summarize the revenue generated by my [Specific Segment]."
To get started, click the dBot icon in your Databank located on the top right corner next to the 'Quick Find' tool and describe what you are trying to accomplish.
1. Creating A New Campaign
- From your left hand menu navigate to the Campaigns section.
- Click the + (Add) icon in the upper right corner of the screen.
-
Complete the required setup fields:
- Campaign No./Code: A unique identifier (required, 20 character limit).
- Campaign Name: A descriptive title for your campaign.
- Description: A brief overview of the campaign.
- Campaign Type: Helps you filter and analyze your fundraising efforts across different channels (e.g., Direct Mail, Email, Event) when you run reports.
- Leave other settings at default for now and save.
2. Managing Segments
Segments allow for detailed tracking of specific fundraising avenues.
- Creating Segments: Open the campaign details and use the New Segment box to add your segments.
- Best Practices: Every campaign should have at least one segment. Segments typically represent channels, donor levels, or specific appeals.
3. Editing Existing Campaigns
- To modify, navigate to Campaigns and click the Edit icon next to the relevant campaign.
Important: Do not modify the existing Campaign Code, as it serves as a unique system identifier for all associated records.
- To edit specific segments, return to the campaign overview and click the Edit icon next to that specific segment.
4. Quick Start: Using the Fundraising Tool
Follow these steps to set up a new donation workflow:
- Identify Donations: Define your segment codes (e.g., channel, donor level).
- Setup Campaign: Go to Campaigns and create/select your campaign.
- Setup Segment: Ensure at least one segment (name, description, code) exists for the campaign.
- Create Form: Go to Forms, add a new form, and select the Single Page Donation template.
- Assign Campaign: Navigate to the Contribution tab on your form and select the appropriate campaign.
- Configure Asks: Click Edit to assign segments and set your ask amounts.
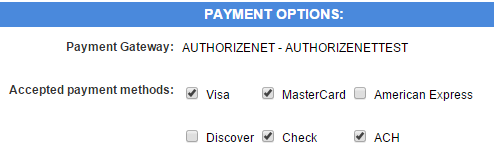
- Payment: Select your accepted payment methods.
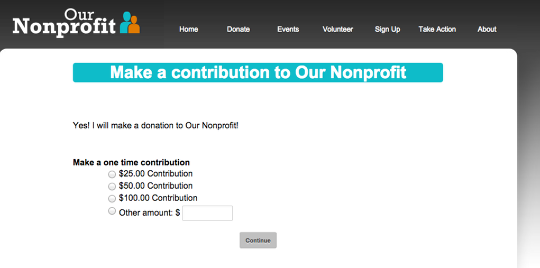
- Review: Use the View tab to verify your page layout.
5. Reporting and Analysis
Use these reports to assess the success of your efforts:
| Report | Purpose |
|---|---|
| Campaign Summary | Provides a comprehensive overview of all campaigns and total revenue generated per campaign. |
| Campaign Detail | A deep-dive report displaying appeals sent, response rates, average contribution amounts, and total costs vs. revenue per segment. |
Access these reports by navigating to Fundraising > Reports.
Advanced Campaign Setup
For a more detailed analysis, the Campaign Detail Report is an invaluable tool. This report displays various key metrics, including the number of appeals sent out, the number of responses received, the revenue generated by each segment, the average contribution amount, the response rate percentage, and both the costs and revenue associated with each segment. When setting up a campaign, it is important to specify several parameters such as the start and end dates, the total number of appeals sent, the overall campaign cost, and the type of campaign being run. Additionally, you should define the quantity for each segment to ensure accurate tracking and reporting.
Editing Campaigns
If you need to make changes to an existing campaign, go to the Campaigns section and select the Edit icon. Then, click on the campaign name, which will be hyperlinked, to open the campaign details for editing. It is important to note that you should not modify the campaign code, as this serves as a unique identifier for the campaign. To edit individual segments within a campaign, return to the campaign overview and click the Edit icon located next to each segment you wish to update. This allows you to maintain accurate and up-to-date information for both campaigns and their segments.
Pro-Tip: Need help with structure or reporting? Use dBot™
If you aren't sure how to organize your segments or which metrics to prioritize, you don't have to do it alone. You can simply ask dBot™—the Databank’s AI-Powered Assistant—to help you plan and analyze your work.
- Building Structures: If you’re unsure how to segment a new effort, try asking dBot: "Help me create a fundraising campaign structure for my [Annual Gala/Year-End Appeal]." dBot can suggest a logical hierarchy of segments based on your goals.
- Generating Reports: Once your data is collected, ask dBot to help you get the insights you need. Try prompts like: "What reports should I run to evaluate the success of my [Campaign Name]?" or "Summarize the revenue generated by my [Specific Segment]."
To get started, click the dBot icon in your Databank interface and describe what you are trying to accomplish.
A quick guide to using the Fundraising tool to take donations. This primer takes you from start to finish in 10 easy steps.
Figure out how you want to identify the donations
For this you will use a segment code to identify your donations.
Segment codes can be by channel, donor level, appeal and more.
Create or use an existing campaign
- Go to Campaigns
- Use an existing campaign (click on the campaign name to add or edit existing segments within that campaign), or
- Create a new campaign by clicking the Add icon
Create campaign, if needed
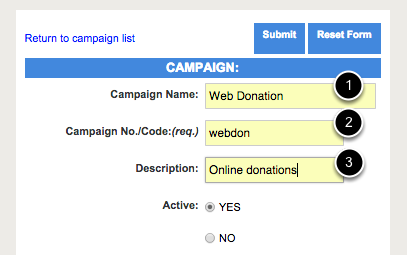
Every campaign needs:
- A name
- A code
- A description
The rest of this page can be left blank for now.
Create segment
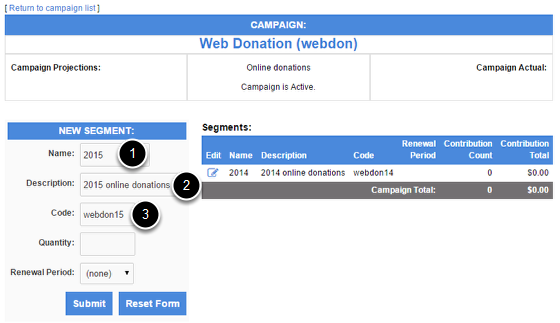
Every campaign needs at least one segment. Every segment needs:
- A name
- A description
- A code
This example uses a timespan, the year, to segment online donations.
Click for more information on Campaign Structure, Campaign Segments and using Segments to Tailor your Appeals.
Create or use an existing Donation form
- Go to Forms
- Use an existing donation page, or
- Create one by clicking the Add icon
Create donation form, if needed
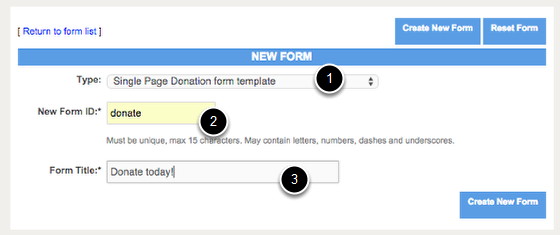
Every form needs:
- A template, Single Page Donation form is the easiest donation template available
- An ID
- A title, this is displayed at the top of the page
Click the Contribution Tab at the top of the form
We will skip adjusting the other properties of this form and just use the default settings.
Click here for an in-depth video tutorial on using the Form Builder.
Select campaign and edit ask amounts
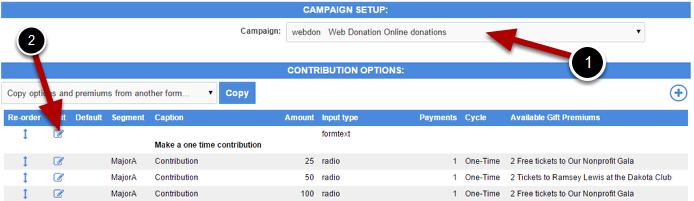
- Select the campaign for this form, each form can have only one campaign
- Click Edit to assign a segment and edit the ask amounts
Ask amounts can alse be deleted from the edit menu.
Edit your asks
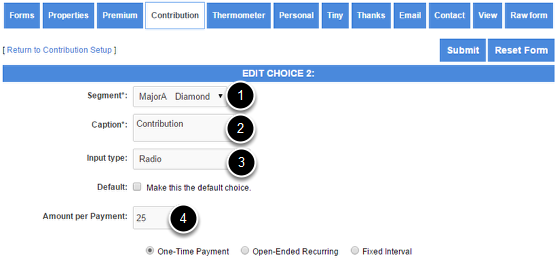
Every donation ask needs:
- A segment
- A caption
- An input type
- An amount
Click here for more information on Input Types.
Select accepted payment methods
Click View Tab to see your donation page
The Thank You page and email can also be customized, but your form is ready to accept donations whether or not those have been personalized.
You are ready to go!
Your campaign and donation form are now ready.
Visit our Support Center for more information on using the Fundraising Tool, PowerMail and Form Builder.
Comments
0 comments
Please sign in to leave a comment.